Cat Nail Caps: Do They Work? Full Guide
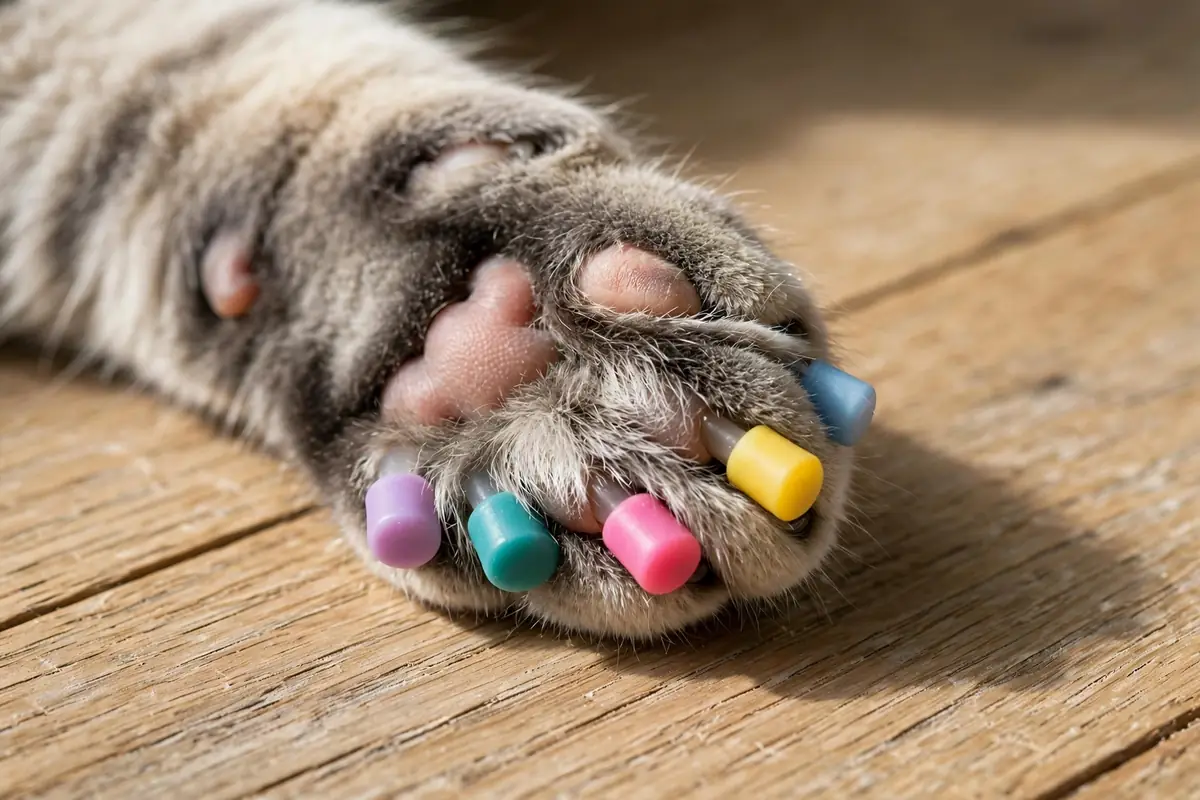
Scratched sofa arms, shredded curtains, little red lines across your forearms — if this sounds like your house, you've probably heard about cat nail caps and wondered whether they're the miracle fix they're advertised to be. Nail caps are soft covers that glue over each claw, blunting the sharp tip so scratching does far less damage.
So do they work? Mostly yes — nail caps genuinely reduce scratching damage to furniture and skin, and many cats wear them without much fuss. But they're not perfect: they fall off regularly, some cats chew them off within days, and they're not right for every cat or every lifestyle. This full guide covers what they are, how to apply them step by step, the honest pros and cons, and the alternatives worth trying first.
What Are Cat Nail Caps, Exactly?
Cat nail caps are small, soft covers — usually made of vinyl or silicone — that fit over each of your cat's claws and are held in place with a dab of pet-safe adhesive. They come in different sizes and even fun colors, and once applied, they blunt the sharp tip of the claw without stopping your cat from extending and retracting their claws normally.
The important thing to understand is what they don't do: they don't stop scratching. Scratching is deeply natural cat behavior — it stretches muscles, marks territory with scent glands in the paws, and sheds the worn outer sheath of the claw. Nail caps simply make each scratch far less destructive, which is why many owners reach for them when furniture, woodwork, or family members are taking a beating.
Caps are most commonly applied to the front paws, since those do the bulk of the scratching damage, though they can be used on all four paws if needed.
How to Apply Cat Nail Caps: A Step-by-Step Guide
Application is straightforward once you've done it a couple of times, but the first attempt goes much better with preparation. Here's the process:
- Trim the claws first. Nail caps fit over trimmed nails — long, sharp claws won't seat properly in the cap. If you're new to trimming, read our guide to trimming cat nails safely at home first, and take care to avoid the quick (the pink part inside the nail).
- Do a dry test fit. Before any glue is involved, try caps on a few claws to find the right size. The cap should slide on snugly and cover the tip without pinching or gapping. Sizing is by the individual nail, not by the cat's weight — a small cat can have surprisingly sturdy claws.
- Fill the cap about one-third full with adhesive. Less is more here. Too much glue oozes out and glues fur to the cap, which is uncomfortable and messy.
- Gently extend the claw and slide the cap on. Press the paw pad lightly to extend the claw, then slide the filled cap over it. Hold it in place for a few seconds so the adhesive can set.
- Work at your cat's pace. You don't have to do all ten claws in one sitting. Many owners do one paw per day, pairing each mini-session with treats, until the full set is done.
- Let the adhesive cure before playtime. Give the glue a few minutes to set fully before your cat goes charging around, so caps don't get knocked loose immediately.
The whole routine gets faster with practice. Most owners find the second full set takes noticeably less time than the first.
How Long Do Nail Caps Last?
Nail caps aren't permanent — they're shed naturally as your cat's claws grow. The claw grows from the base, gradually pushing the cap outward until it pops off on its own, usually after several weeks. Because each claw grows at its own pace, caps fall off one at a time rather than all at once, so you'll be replacing individuals as they go rather than redoing the whole set on a schedule.
Plan on checking your cat's paws weekly and reapplying caps as they shed. Keeping a few spare caps and adhesive on hand means you're never caught with a half-capped paw. Cats who scratch vigorously on rough surfaces may lose caps faster, while calmer cats may keep a full set for a good while. You'll quickly learn your own cat's rhythm.
Pros and Cons of Cat Nail Caps
Where they shine:
- Furniture and fabric protection. This is the number one reason people try them. Blunted claws snag far less on sofas, curtains, and carpets.
- Gentler scratches on people. In homes with small children, elderly family members, or anyone whose skin tears easily, caps can make everyday handling noticeably safer.
- A humane, reversible option. Unlike declawing — which is the surgical amputation of the last bone of each toe and causes lasting pain and behavior problems — nail caps are temporary and don't alter the cat's body at all.
- Useful for specific situations. They can be a helpful bridge while you train a new cat to use a scratching post, or for short-term needs like protecting furniture in a rental.
Where they fall short:
- They fall off. Regular reapplication is part of the deal, and buying replacement kits adds up over time.
- Some cats chew them off. A determined cat can remove caps within days — or hours. Cats who obsessively chew at them shouldn't keep wearing them.
- There's a learning curve. The first few applications can be fiddly, and a stressed cat plus wet glue is nobody's idea of fun.
- They don't teach scratching habits. Caps manage the damage, not the behavior. Without scratching posts and training, you're treating the symptom indefinitely.
Sizing Tips and Common Application Mistakes
Getting the size right solves most nail-cap headaches. Caps that are too large slide off within days; caps that are too small won't seat properly and can press uncomfortably on the claw. Always size by the individual nail — front claws and back claws on the same cat can need different sizes, and kittens will outgrow sizes as they grow.
The dry test fit (step two above) is non-negotiable: never glue a cap on before confirming the fit without glue. If you're between sizes, the snugger option usually stays on better.
Common mistakes to avoid:
- Skipping the trim. Caps over untrimmed claws fit poorly and pop off fast.
- Using too much adhesive. A third of the cap is plenty. Excess glue bonds fur to the cap and makes everything miserable.
- Capping every claw in one stressful marathon. A tense cat plus ten wet caps is a recipe for a bad experience. Spread it over sessions.
- Ignoring a chewer. If your cat immediately starts gnawing caps off, take the hint — forcing reapplications stresses you both out.
When NOT to Use Nail Caps
Nail caps are safe for most healthy indoor cats, but there are clear situations where you should skip them:
- Nail infections or injuries. Never cap a claw that's broken, bleeding, swollen, or showing discharge. Covering a damaged nail traps the problem underneath. See your vet first.
- Signs of irritation or allergy. If the skin around a capped claw looks red or swollen, or your cat suddenly starts limping or obsessively licking a paw, remove the caps and call your vet.
- Outdoor cats. Cats who go outside need their claws for climbing, balance, and self-defense. Blunting them removes tools your cat relies on to stay safe.
- Cats who chew and swallow the caps. An occasionally chewed-off cap is normal, but a cat who regularly swallows them risks digestive upset — check with your vet.
- Very anxious cats. If the application process itself causes real distress — panting, hiding for hours, aggression — the stress cost outweighs the furniture benefit. The kinder alternatives below are a better fit.
Alternatives: Trimming, Scratching Posts, and Smarter Setup
Before committing to a lifetime of reapplying caps, it's worth trying the fundamentals — they solve the scratching problem for most households on their own.
Regular nail trimming is the simplest fix. A quick trim every couple of weeks keeps claws blunt enough that scratching does far less damage. It's free, takes minutes once you're practiced, and most cats accept it calmly when it's paired with treats. Our step-by-step nail trimming guide walks you through it.
The right scratching posts redirect the behavior instead of fighting it. Offer both vertical and horizontal options — different cats have different preferences — in sturdy materials like sisal, and place them where your cat already likes to scratch, not hidden in a back room. Reward use with treats and praise so the post becomes the rewarding choice.
Protect the hotspots while training is underway: double-sided sticky tape or furniture guards on the sofa arm make the old scratching spot less appealing, and keeping claws trimmed reduces the damage in the meantime.
Many owners find that trimming plus a good scratching setup eliminates the need for caps entirely. For more everyday grooming know-how, explore our Care Guides — or start at the Purrfect Paws homepage to browse everything.
Frequently Asked Questions
Are nail caps safe for cats?
When they are the right size and applied correctly, yes. Caps do not prevent the claw from retracting, and most cats walk, jump, and scratch normally while wearing them. Stop using them and call your vet if you notice redness, swelling, limping, or obsessive licking around a capped claw.
Can cats still scratch with nail caps on?
Yes — the scratching motion stays exactly the same, which is actually a good thing, since scratching is healthy, natural behavior. The caps just blunt the tips, so each scratch does far less damage to furniture, carpets, and skin.
Do nail caps hurt cats?
No, not when they are sized and applied properly. A well-fitted cap should not pinch, restrict the claw, or change how your cat walks. Pain or limping means something is wrong — the cap may be the wrong size or the nail underneath may be injured — so remove it and check with your vet.
How do I remove a nail cap?
Usually you do not need to — caps fall off on their own as the nail grows. Never yank a firmly attached cap off, since that can damage the nail. If a cap needs to come off early, or one seems stuck and irritated, let your vet remove it safely.
Are nail caps better than declawing?
Overwhelmingly, yes. Declawing is the surgical amputation of the last bone of each toe — it causes chronic pain and is banned or condemned in many places. Nail caps are temporary, painless, and completely reversible. That said, regular trimming plus scratching posts is the simplest long-term solution for most cats.